Terminate Citrix Session/s via PowerShell

Hello! Once again another PowerShell Code for you to automate quite common task which is done daily on a support engineer perspective.

I use this script pretty much everyday at some point its much easier when you do it via PowerShell, the reason i say this you will have to login to the Citrix Cloud click here and there to find the right place where you need to look for a specific user and then you will need to see how many session he/she has opened and then select the right session. Then you would go into that page and click logoff or disconnect. which is a very mundane task but what we are talking here is about time (TIME IS MONEY).

Imagine now you have to do it for around 20 users, 50 Users, 100 Users and etc.

The Time comes in handy when you have simple script which will save all those time in-fact you can schedule or many other ways to trigger but lets talk about that later now. let me show you how does this script looks. Before that you need make the initial connect to the Citrix Cloud click here to learn how to.

Enough is said here you go:

Set-XDCredentials -ProfileType CloudApi -StoreAs default -CustomerId "customerID" -SecureClientFile C:\Temp\secureclient.csv

$users = get-content -path "C:\Users\Fazul\Download\names.txt"

foreach($user in $users){
$samuser = $user.accountname

$output = "D:\Citrix_termination\Termination_$samuser.txt"

 Get-BrokerSession -UserName "Domain\$samuser" -Filter { DesktopGroupName -like 'UK-W10*'} | select UserName,machinename,DesktopGroupName,EstablishmentTime

    if($results -ne $null){
            foreach($result in $results){

                (Get-Date -Format "yyyy-MM-dd HH:mm:ss") + " -> Active Session Found - " + $result.UserName+ " | "+$result.MachineName+ " | "+$result.DesktopGroupName+ " | "+$result.EstablishmentTime >> $output
                
		try{ 
		Get-BrokerSession -UserName "lseg\$samuser" -Filter { DesktopGroupName -like 'UK-W10*'} -ErrorAction stop #| Stop-BrokerSession 
		}catch{ 
		(Get-Date -Format "yyyy-MM-dd HH:mm:ss") + " -> " + $samuser + " Citrix Session unable to terminate!!!">> $output 
		}

                (Get-Date -Format "yyyy-MM-dd HH:mm:ss") + " -> " + $samuser + " Citrix Session test terminated!!!">> $output
            }
}
}

Quick Explanation on the function of the script above.

The script starts by setting some credentials for a cloud API, and then retrieves a list of user names from a file called “names.txt” located in a folder called “Download” on the user’s computer.

For each user in the list, the script searches for any active sessions for that user on a Citrix server. If an active session is found, the script attempts to terminate it. If the termination is successful, a message is written to a log file indicating that the session was terminated. If the termination fails for any reason, an error message is written to the log file instead.

The log file is created in a folder called “Citrix_termination” located on the user’s computer. The log file name includes the user’s account name as part of the file name.

Overall, the script automates the task of searching for and terminating active sessions on a Citrix server for a list of users, and provides a log file to keep track of the termination attempts.

Hope this Helps, Have a great friday.

Microsoft Designer!!

Welcome back to another blog, this time its not about Powershell. Its about Microsoft Designer. Why am talking about this?

Thanks Microsoft for allowing the preview of Microsoft Designer.

In my point of view this is great tool for content creation who ever wants to start content creating but struggling to create images or graphics content or already started, this tool could help both.

There is a limited set of users who are given access to Microsoft Designer from a join list. my request was approved and given Preview access to the tool. which is incredible.

Microsoft is heavily focusing on AI integrating with most of the there exisitng products and services like ChatGPT with bing, Azure AI Platform and AI based design tool much more to come.

Enought of my chatter lets me show what Microsoft Desinger is.

Microsoft Designer

In the Above image you can see how straight forward is the Microsoft Designer is all you have to do let the designer know what time of image or graphics content are you looking for.. to put things into prespective i will show you some capabilities of this tool below or in other words messing with the tool to see what it can do.

Result from Microsoft Designer

Just like that the Image is ready on the side panel, let do another one to see how deep can it go.


Lets actually create a Poster

I am going to create a poster using the Microsoft Designer. Lets do it…

have asked the Designer Copilot to generate a empty road with motivational qoute its given the me lots of templates i have chosen the once marked on the image above. lets edit it to the way i need it.

This a quick result of what i did in less than a minute. when it comes to productivity this tool is going to help a lot of people who are trying to get into content writing, infographs, posters and lots more, the tool also show recommendation let me show another one which is comletly made using the content i have passed on to this image.

I Mean look at this image above simple and to the point on what i need to express. I am barely scratching the surface here on this tool. will try to create something sooner using full functionality of this tool.

From a desingers prespective this tool would help millions.

Until Next time see ya….

Retrieve Current Admin in Citrix Cloud

Hello and welcome again, its been a while since I wrote a blog post. Obviously been busy with other stuff, Enough of my stuffs lets get into the title.

let’s start with a small and nice script, One of my colleague asked me to let him know how many Admin users are there in the Citrix cloud.

Obviously for monthly account audits. Before getting into the script do the pre-requisites Click here (How to connect to Citrix cloud )

Lets get into the code now.

Add-PSSnapin citrix.*

Get-AdminAdministrator -MaxRecordCount 9999 | select Name,Enabled,rights 

Here comes the explanations: Starting with the adding the PS-Snapins, which loads the Citrix commands into the Powershell for you to use.

Now comes the Killer one line: Get-AdminAdministrator. This command will get you all the necessary information shown below. The MaxRecordCount is to display all I went with 9999 the default is 249.

From the above we can just filter the information that will make use decision much quicker, Will pipe the result and select the requires fields shows in the script above.

result of the script

Hopefully this small and quick blog post helped someone. Until next time.

Compare 2 Files for Difference

Hi All, welcome back to another Blog. I was approached by an subscriber today who is a beginer to Powershell made an awesome script which user compare-object function to compare to files. which was great start in powershell. Like i say to get to know something you need to get started. Applause to him.

The requirement was to compare 2 files to find difference, obviously there are more than one way to find difference the below script is one of those ways.

$PreFile = import-csv -LiteralPath "D:\YooAdmin\PreProcess.csv" 
$PostFile = import-csv -LiteralPath "D:\YooAdmin\PostProcess.csv"
$forHTML = @()

foreach($pline in $PostFile){
    foreach($line in $PreFile){
        if($pline -ne $line){
            $pline | export-csv -Path D:\YooAdmin\report.csv -Append -Force -NoTypeInformation
            $forHTML += $pline
            break
        }
    }
}

$forHTML | ConvertTo-Html | Out-File -FilePath D:\YooAdmin\report.html

In Summary: there are 2 file PreProcess and PostProcess both CSV
Both data in the CSV is loaded into variables and an Array to load the result for creating an html report as requested by my subscriber.

Then we get in to Loops, where you can basically check 2 file classed as array to compare.
The first loop will load the files that will be check against to see if there is any difference we call is reference and the next one is difference file.

if the a result in first loop is not equal to the result in second loop. then export that line to a CSV and add it to the Global Array, once that is done we break the loop to end it.

after completion of the loops the global varible had collected all the fields and ready to export as Export to HTML.

it’s a quick script for me but for someone who is starting with powershell this could be a milestone and moment of getting way deeper and better than me in powershell.

All the Best.

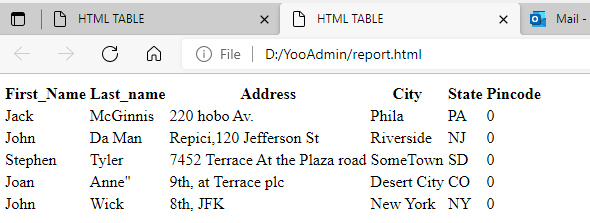
here is the result on html showing on the difference.

result from script above

Manage Citrix Cloud via PowerShell

Welcome to another blog on Citrix and PowerShell. Today we will see how to manage Citrix Cloud via PowerShell. Before getting started please refer to the previous blog if you need to know how to setup the Citrix PowerShell.

Simply Click here (Getting Started with Citrix Cloud via PowerShell).

Let see how to do few things from PowerShell on Citrix Cloud like Getting Sessions details

Get-BrokerSession

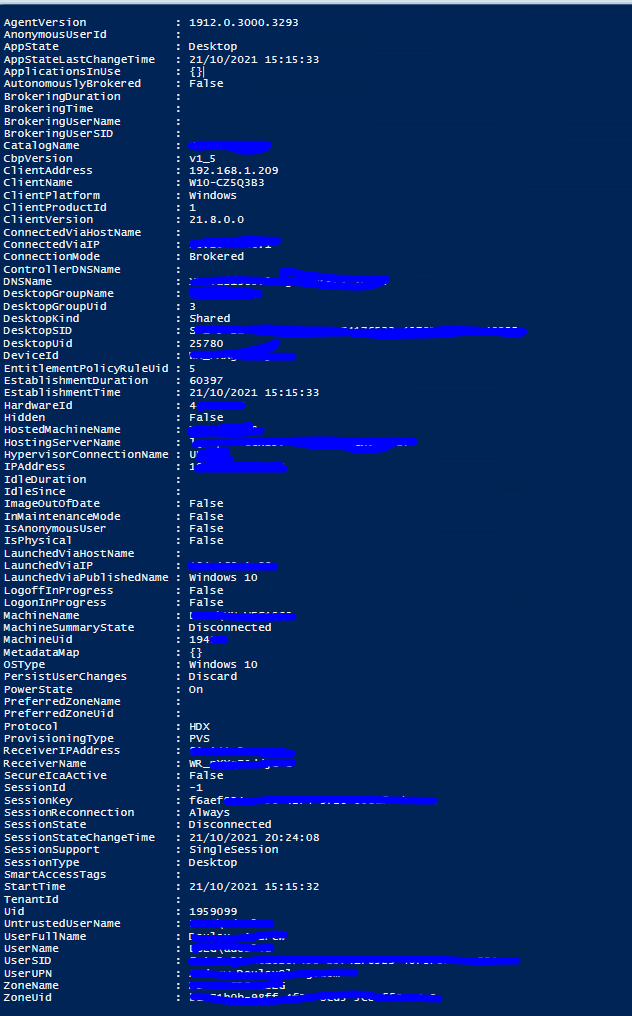
Above command will get all of the session that is made to the Citrix Cloud including App session and Desktop session. Below is result of a session details, Obviously I have to hide sensitive details.

get-brokersession result

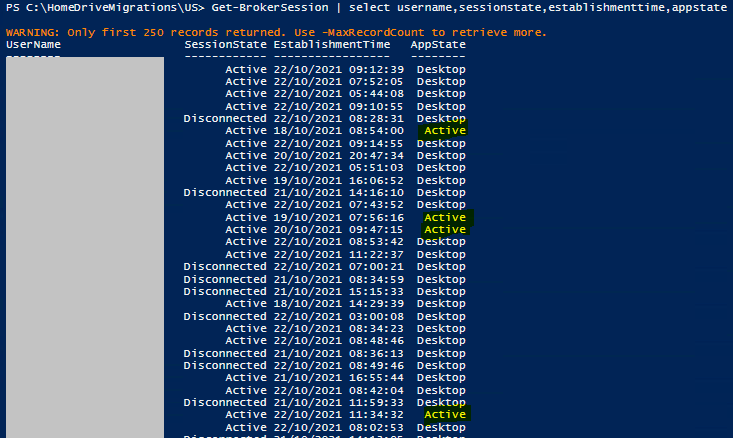
There are lots of information in Get-BrokerSession where you can select the only fields you need which will make more sense and easy by simply using the below example command for selecting username, sessionstate, establishmenttime, appstate

get-brokersession | select  username,sessionstate,establishmenttime,appstate
Result of the above command

The AppState that Says Active are the Application instance, highlighted to make a not of it.

Now you know how to get data for BrokerSession let me show you what else you can do with it. based on the information we have we can see sessionsate is disconnected. Imagine you have 1000 of disconnected session on floating VDI on the weekend you need to Stop brokering from Citrix Cloud. You can easily write a PowerShell command as below to achieve it.

get-brokersession -Filter {Sessionstate -eq 'Disconnected'} | Stop-BrokerSession

This will get it done rather you logging into the Citrix Cloud and searching for machines that are disconnected and select all to Stop it. this one liner will help you save time where you can set it to run weekly simply, that’s the power of PowerShell.

There are 274 Broker based PowerShell Command, Image the power of the PowerShell combined with Citrix. The Commands from Citrix here

You can basically manage and Automate 95% Admin work with the PowerShell. I have barely scratched the surface with this blog on managing Citrix from PowerShell

Do let me know if there is any specific commands in Citrix Cloud you need to write about or build an automation.

Have a Nice day.

Getting Started with Citrix Cloud via Powershell

Hello, Welcome to another blog of mine, Today will look at how to manage Citrix via PowerShell. You can do some extraordinary tasks via PowerShell paired with Citrix Cloud.

Prerequisites: Citrix PowerShell SDK Install the SDK for the relevant version of Citrix XenDesktop environment. Once the installation done we can now start writing our commands and scrip to manage Citrix XenDesktop.

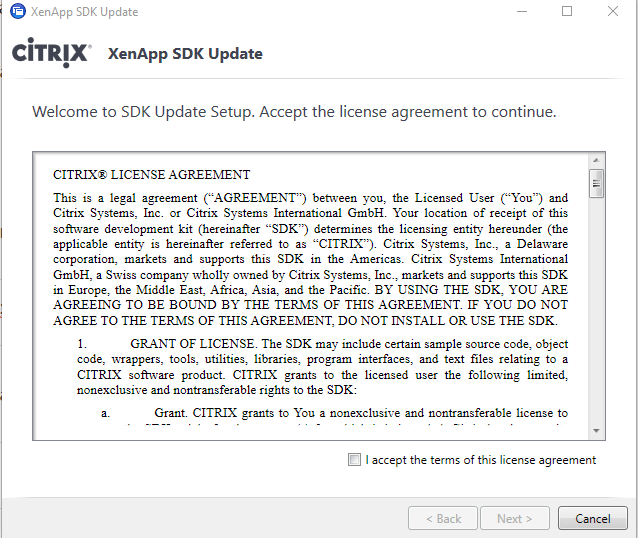
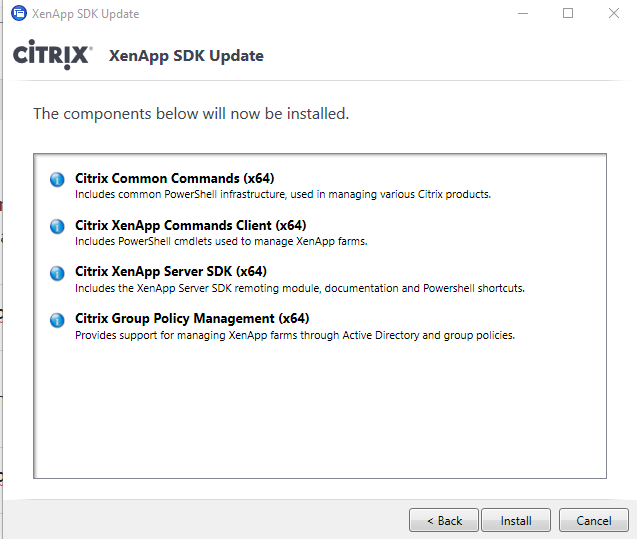
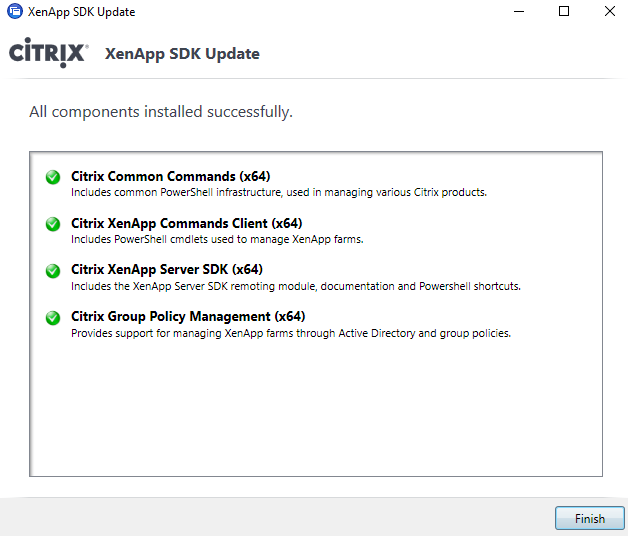
It’s straightforward installation as you can see below:

EULA
Components that are to be installed.

Once you click Install

Components Installed.

Hooray, we have installed Citrix XenApp & XenDesktop SDK, Now first thing you need to do is to add the PS Snap in for Citrix in PowerShell, |The below command will add the Citrix snap in for us to use.

Add-PSSNappin citrix*

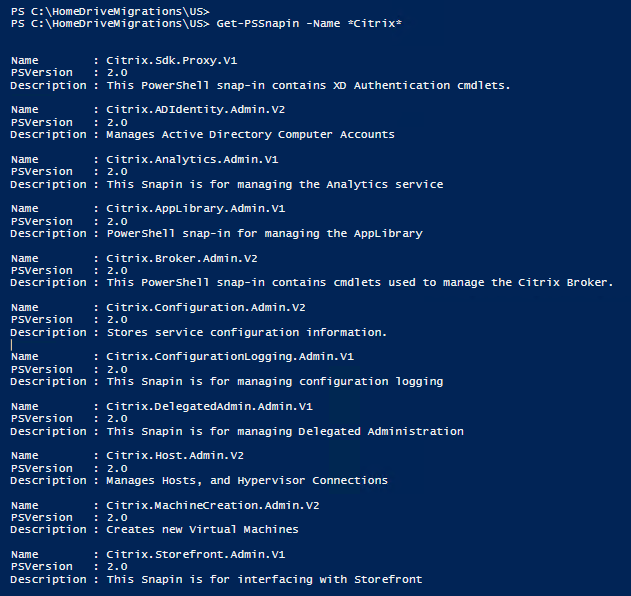
Now check if the Citrix Snap-ins are added correctly using the below command.

Get-PSSnapin -name *Citrix*

You can now see that Citrix Snap ins are added to PowerShell successfully.

All good, lets start with the authentication before we start any commands, we should enter the below line. The easiest and the best way according to me is to leverage the CloudAPI in Citrix. You will need to create a Secure Client for Citrix Cloud APIs by logging into Citrix Cloud Console.

After creating Secure Client

You will get a ID and Key which you can download and use it for authentication for the below command.

Set-XDCredentials -CustomerID "You Customer ID" -SecureClientFile "You File Location" -proFileType CloudAPI -storeas Default

This command will authenticate you via Citrix Cloud API on you powershell Session.
Will catch you guys with Managing Citrix Xendesktop via Powershell on the next blog.

Import P12 Certificate

Heyyy… It’s been a while since i wrote a script, completely been busy with lots of other stuff. Anyways enough of my stuff lets get into the script and how this came as a request.

I had a colleague who asked me if i can get a cert deployed to wide range of workstations. I took this chance to write this quick script to deploy it via SCCM.

Import-Pfxcertificate -FilePath "Path of the Certificate" -Password "Password if required" -CertStoreLocation "Cert:\LocalMachine\Root"

The Script is very simple as you can see it requires 2 or 3 (if password is needed to import the Cert) Switches.

-FilePath = where the Cert is located easy way to get it. Locate the Cert and do a Shift + Right click and Copy as a path.
-Password = Some Certs will be password protected (Infact mostly on a Corp environment.) what is did instead of passing the test as it is i created a SecureString Variable as shown below. Which came in handy incase of changing the password for another cert while using the same Script.
-CertStoreLocation = This is where you want to place the Cert.

Click Here to see Microsoft’s Documentation – https://docs.microsoft.com/en-us/powershell/module/pki/import-pfxcertificate?view=windowsserver2019-ps

$pwd = 'Password' | convertto-securestring -asplainText -Force

This $Pwd Variable now can be used across the script rather than using the actual password everywhere in the script.

Export AD Sites and Subnets

Hi Guys! Welcome back to another Blog. I have built a script that will get AD Sites and Subnets from a Client machine (Doesn’t have to be a server), The reason why I wrote this is to show how powerful PowerShell is.

My objective is to show that PowerShell can do a lot of things not from a server end but from Client as well.

You can leverage the Static Class and methods to achieve a lot of the functions. For an example if you want to know how to see what classes are available click this Link.

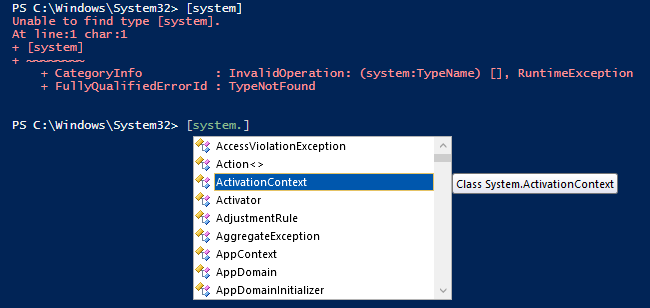
Let me know show in Powershell now, to use a Dot Net Class in PowerShell you can use as the following

[System.className]
Identifying System Class

There are also Namespaces which can also be accessed via PowerShell. as below

Identifying System Namespaces

By accessing the namespaces within a namespaces to find the correct Class you can do amazing things such as this script below.

$MachineName = hostname
$GetSites = [System.DirectoryServices.ActiveDirectory.Forest]::GetCurrentForest().Sites
$Report = @()

Foreach($Site in $GetSites){
   $Report += new-object -type PSObject -Property (@{
       SiteName = $Site.Name
       SubNets = $Site.Subnets -Join ","
       Servers = $Sites.Servers -Join ","
   })
}

$Report | out-gridview

Got the details and passed it to a Hash and displayed out as a table for easier view.

Result with blur

Unfortunately I cannot show you the result.

Hopefully this will help you.

Find any Module via Powershell

Welcome Back to another blog of mine. I was training few of my colleagues on Powershell and one of them asked me following question.

How do you find module if its not already in Powershell???

I said: You can find anything you want if you search correctly.
They said: That’s not very helpful is it, tell us the easy way mate..

I was like grrrrr let me have my moment to feel like a master 😛

That’s when I taught them this small script which basically made all of them to explore Powershell more.

Find-Module 

There is simple thing you need to do before you start finding modules. these are not mandatory but standard practice:
1. Open Powershell.exe or Powershell_ise.exe as an Administrator.
2. Start Finding 😉

They asked me to show how find Exchange Online modules and install it.

Get-Module -ListAvailable

Using the above module you can see what are the available module currently loaded into the memory that you can use without having to install or import.

Now you know the required Module is not there, you will be using the Find-Module Command to search the repository PSGallery

Note: There are 6607 modules in PsGallery (How do I believe this guy? Look at the below snip)

Find Total module in PSGallery
Find-Module ExchangeOnlineManagement
Finding ExchangeOnlineManagement Module via Powershell

They also asked me: That’s cool. What if I don’t know the full name of the module??
I said: That’s a good question let me show you something interesting and showed the below.

Finding Module using wildcard

If you don’t know the full name of the module you always use * after the noun that you are looking for in this scenario I used “Exchange*” meaning Modules that has the name starting with Exchange will come up as a result for you to choose the right one by reading the Description.

Once you find the right one in our case it will the ExchangeOnlineManagment. Let go ahead with Installing the Module and Importing it.

Install-Module -Name ExchangeOnlineManagement -Force -Confirm:$false

Now we know the module name we can run the above command, the 2 switches -Force and -Confirm:$false is to reduce UI interaction and override if the version is already existing in the Computer. If you run without the -Confirm:$false switch you will be prompted to allow the installation of the module.

Once installed you can see the commands that module has using the following command.

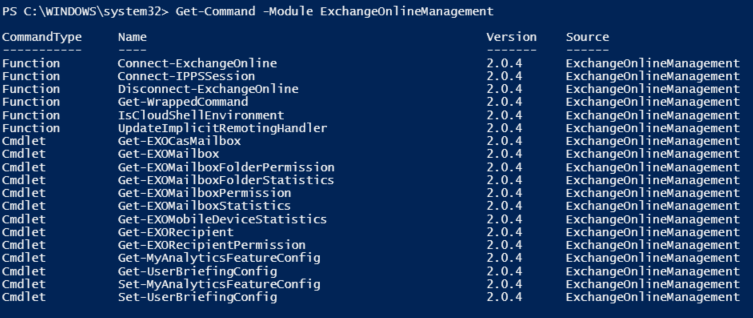
Get-Command -Module ExchangeOnlineManagement
Result of above script

Now all you have to do it is connect the Exchange command and start working.

Finding modules are so easy, most of the time you don’t have to open a browser.

Hopefully this is helpful.

Manage Azure AD using PowerShell

Welcome to another blog of mine, Managing Azure AD using PowerShell
One could ask why go through all the pain of scripting stuffs in PowerShell when there is a pretty nice Portal Console like this below.

Azure Portal

I would agree with the most of them saying portal is enough but PowerShell comes in handy when it comes bulk deployment or anything that needs to be done more than ones or repeatedly.

For instance let say there are 20 New Users joining your Organization. You got 10 mins to do onboard these user to Azure AD – you would probably look at me like No way, you’re dreaming. That’s when I will tell you this “Ohh you should use PowerShell instead ;)”

That’s one of the many examples that came in my mind. Now you probably have agreed with me and be like ok Show me the PowerShell way of doing this quickly then.

Its Pretty Simple if you see the below script to Install, Import and connect to Azure AD.

Install-Module msonline -scope currentuser -force -confirm:$false

The above command is what you might run first to install the Azure PowerShell Module in you machine. (Keep in mind this requires Admin Privileges so run you PowerShell as Admin.)

Once you have installed the Module next on the list is to Import it.

Import-Module msonline
Result from the Script

This is what it would look like once imported. How do you check if the module is imported? Well let me show you, Run this simple command and you should be able to see.

Checking if module is imported

Now we have installed and imported the module next would be connecting to the MsolService (Microsoft Online Service)

connect-msolservice

Once you enter the above command you will be asked to enter you Creds, shown below:

Portal login window

Once you logged in successfully now you are all set to go and do some cool PowerShell script.

As for my example above lets say you are going to create users in Azure AD, let’s create the user now I am going to onboard Elon Musk as my first staff :P, Lets see the script for that.

New-MsolUser -UserPrincipalName "User UPN" -DisplayName "Elon Musk (Tesla)" -FirstName "Elon" -LastName "Musk"

You need to add your Domain name in the UserPrincipalName property and a Random generated Password would be added to the user account. Let see the result so the above script

Elon Musk On-boarded

Tadaaa… Successfully onboarded Elon Musk. By Default it show that created user has license of not. Lets verify in the portal to see if he is there?

Elon Musk in added successfully

It’s that easy to create a user using PowerShell now lets create a Group as well and call it “Technical Team” Currently I only have 2 groups.

group console in azure portal

Script is so simple to create a group in Azure AD, Let run the command see the result below.

New-MsolGroup -DisplayName "Technical Team" 
Group created in Azure AD using powershell

let check in portal now. BOOOOM here you go!

Security Group in Azure AD

Creating users and groups are so simple and easy to do it via PowerShell.
Now Lets add all the Accounts in the tenant to the Technical Team Group, A simple foreach loop should do the job for us.

Current state of the technical team group – No users

let run the Foreach loop.

foreach($user in (Get-MsolUser)){
$ObjectId = Get-MsolUser -UserPrincipalName $user.userprincipalname | Select-Object objectid
Add-MsolGroupMember -GroupObjectId "bed87ae6-b609-4488-8140-1ac652b2d8ed" -GroupMemberType User -GroupMemberObjectId $ObjectId.ObjectId
}

Let check the console to see if the Users are added?

users added

Now We have created a user & security group in Azure AD and added the users to the security group now lets add a DeveloperPack_E5 license to Elon Musk so he can start working.

Lets check the current license status for Elon and add him a license.

 Get-MsolUser -UserPrincipalName "user UPN"| select userprincipalname,displayname,licenses
Current License state for a User

Lets add the license now.

Set-MsolUserLicense -userprincipalname "User UPN" -AddLicenses "yooadmin:DeveloperPack_e5"

let see the result in the PowerShell and also in the Azure Portal.
In Powershell you can also search via the display name as shown below.

Powershell Checking License for the user
Result from Azure Console.

It’s that simple to manage Azure AD using Powershell.

Conclusion: If you are managing azure Ad via Powershell its going to be great as you can do a lot of automation such as User Onboarding process, License assign based on ad group assignment, disabled users who left the organization, get license count update and many more.

Will be doing lots of Azure Powershell based resource creation.